Chapter 5 Annotating Code
Or, how to make your code understandable to your collaborators and future self.
5.1 Lesson Objective
Implement low-lift practices to ensure research code is human-readable, reusable, and shareable.
5.2 Key Terms
- Absolute Path: The path, or address, from the root of a computer’s file system to a directory or file of interest.
- Dependencies: Here, a software component (like a program or library) that is required for your code to run. For example, R users frequently use the tidyverse, making their code dependent on the tidyverse’s packages.
- Global Variable: Although the term varies between languages, here we mean a variable that is accessible throughout the script (i.e., not defined locally within a function).
- Human Readability: How understandable a code file’s purpose, function, and underlying logic are to a human, rather than to the computer executing the code.
- Libraries/Packages: Although the term varies from language to language, these are packaged up units of code that are publicly accessible and reusable. Often, they are written by the language’s users. Python packages are available on the Python Package Index (PyPI), R libraries on the Comprehensive R Archive Network (CRAN), and Stata programs on the Boston College Statistical Software Components (SSC).
- Modularization: The practice of dividing something–in this case, code–into separate, independent modules or processes.
- Relative Path: The path, or address, to a directory or file of interest, relative to the current working directory.
- Research Code: Here, the scripts that you and your lab use to work with your research data–for example, to scrape, clean, modify, combine, analyze, or visualize it.
- Working Directory: The directory within your computer’s file system that you are currently “in;” the directory that a computer program can currently see or access.
5.3 Lesson
This lesson discusses simple ways to increase the sustainability of your research code. By sustainability, we mean the likelihood that your code will be understandable and reusable across time or in different hands. While “code” can mean a million things, here we are referring to the scripts that you and your lab are actively using to work with your research data–for example, to scrape, clean, modify, combine, analyze, or visualize it. (This lesson will use the terms “script” and “code” interchangeably, and is not necessarily designed to apply to “software,” where software is referring to a program that your team wants to package and make broadly available as a deliverable in and of itself.)
These practices will be applicable to your code whether you work in R, MATLAB, Python, Stata, or another language, although you may need to use your own expertise to adapt them appropriately. Applying them will be a boon to yourself in the future, as you reacquaint yourself with the details of a project you worked on weeks, months, or even years earlier; or to whomever may be the recipient of your project if it is handed off to a new cohort of researchers.
It’s helpful to imagine your research code like a book that someone would read from beginning to end:
“Programming is best regarded as the process of creating works of literature, which are meant to be read.” 2
Write the title page.
The easiest way you can improve the sustainability of your research code is to start every script with a header: a chunk of comments providing basic metadata about the script and its purpose. A single comment that says who wrote the code, when, and for what purpose is better than nothing, but ideally your header will include more information, like your contact information (an email address you anticipate checking even if you move on from your current institution would be best) and that of any collaborators. Here’s an example using comments in R:
# ------------------------------------------------
#
# Author(s):
# ORCID:
# Email:
#
# Date(s):
#   Created: 2025-04-26
#   Last modified: 2026-01-02
#
# Purpose/Description:
#
# Project Working Directory:
#
# Notes:
#
# ------------------------------------------------
While it won’t take long to write a header each time you start a new script, you can also create and reuse a template, which has the added benefit of standardizing the information you provide in all your code files. Both RStudio and Visual Studio Code allow users to define snippets, which makes it easy to quickly insert a header template (resources for doing this are linked in the “Further Readings” section below). If the environment where you write your research code does not support this, you could simply write a template in a Google Doc, Word document, or text file and copy/paste it into your scripts.
Establish the setting.
After the header, begin your script by loading in or installing any packages/libraries you will be using. Even if you don’t call a function from a package until the middle or end of your script, it’s ideal to load everything all at once at the top, and allow future users of the script to quickly see what dependencies it will require.
Next, set your working directory using a relative path. This requires that you have organized your code file(s) and any other files you will need the code to interact with (e.g., image files it will process, or a CSV it will read in and manipulate) so that they are statically related to each other. For example, you might store your raw data in a folder called “raw-data,” and your processing code in a folder called “processing-scripts,” with both folders nested within the overall project folder. The script and the data it needs to access are then parallel to each other in the folder hierarchy, and this will remain true no matter where the overall project folder is located–on GitHub, maybe, or in a colleague’s Downloads folder after you have emailed them a zipped version of the project files.
NOTE: see the Navigating and Organizing Files lesson for more information on organizing files so that they are statically related and on the difference between relative and absolute file paths.
Introduce the characters.
You should also declare any global variables (in Stata, global macros) toward the top of the script and include comments that define what the variables store (see below for more information on writing comments). If you are writing your own functions (for Stata, programs) and it makes sense to include them in this script–either because of the conventions of the language that you’re writing in, or because it is a relatively small amount of code–it’s a good idea to include the functions here, toward the top of the script, before calling them below. (The exception to this rule is MATLAB; local functions should be declared at the end of script files in this case.)
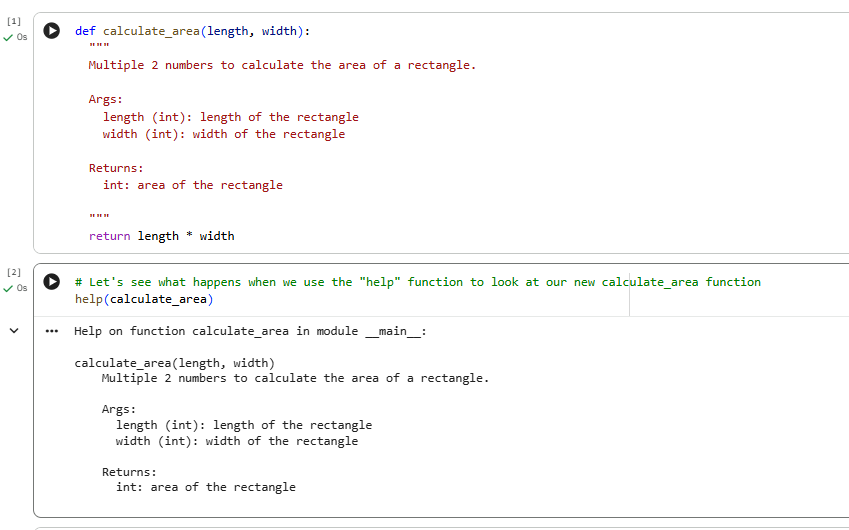
If you are a Python programmer, you should be familiar with docstrings, a special kind of comment used to define the purpose, parameters, and output of a user-defined function (or module, class, or method). We highly recommend taking the time to use this documentation standard; it’s a great, low-lift way to ensure that your functions are understandable and reusable in the future. In MATLAB, this is accomplished through help comments, which are placed immediately after the function line. In other languages, you may emulate docstrings for your functions/programs by simply adding comments, although this will not result in you being able to use help commands to access the documentation, as a docstring in Python allows (example below). For this feature, R users may be interested in the docstring package, written by Dason Kurkiewicz and available on CRAN.
Organize the plot and title your chapters.
Like novels on a shelf, the “plot” of every project’s code will differ widely, so the advice here is broad: organize the rest of your code following the order of the research workflow, and use comments as “chapter” or section headings. If the process is simple, this may look like a section called “Cleaning” that contains the lines of code used to prepare the raw data for analysis, followed by sections for each of the analyses or models. Ideally, the outputs of the analyses will be saved externally at the end of the script or the end of each section. For much larger projects, we might imagine the project not as a book, but as a series, with entirely separate code files for data cleaning, writing functions, calling those functions to analyze the data, or visualizing results. This scenario is an example of modular programming, where we separate components of a project so that each completes a single task in the overall workflow.
Strategically employ narration and description.
Like the other practices here, including descriptive comments throughout your code will help ensure that future readers–including your future self–can quickly move from orienting themselves to the code to making use of it.
Comments are usually added to code when…
- An action will result in a new or modified variable,
- An action will alter a dataset/frame,
- An action will result in an output (to console or to your machine),
- User input will be required,
- Conditions must be met (e.g. adding argument) before running a code block,
- Users need to alter the code for their needs,
- A function is defined,
- Or in any other case when an explanation is needed or the underlying logic should be articulated.
The table below shows the syntax for adding comments in each of the languages discussed in this lesson.
| Language | In-Line | One-Line | Block |
|---|---|---|---|
| Python | # | # | “”” comment here “”” |
| R | # | # | Not supported; use multiple 1-line comments |
| Stata | // | * | /* comment here */ |
| MATLAB | % | % | %{ comment here %} |
5.4 Conclusion
In sum, implementing these practices to the degree appropriate to your work, and in keeping with the conventions of the language in which you are writing, will make your code as readable as a story book. Additionally, you can apply these practices to code that you inherit from previous lab members. Although it will require you to dig into the code to understand it fully, adding thoughtful annotations will ensure that your successors can more easily and quickly jump into the work.
5.5 Exercises
Complete the following file organization activities with either your own project files or the provided example dataset. (NOTE: clicking the link will download the dataset in a zipped folder called organizingAnnotating.zip.)
If you would like an example of how to complete this exercise, we have applied the lesson to the script 20240317_DNN_sp4_CS.py HERE.
- Create and fill out a header at the top of your script. Include any relevant metadata, including your name and the names of anyone else who contributed to the script, an email by which you can be reached, when the script was created and why, and any other relevant information.
- Organize your code itself either into logical sections within the script, or broken into several different files as makes sense for your project.
- Add sufficient comments throughout your program to make it understandable to someone who does not code.
- Add an entry to your Data Management Log to note that you annotated/edited/changed your code.
Note: In the course of organizing and annotating your code, you may identify small errors (for example, importing a package twice) or ways that you can improve the script. It’s not a bad idea to use this step to clean up your code, but you can also decide to make notes for yourself to come back to later. Add comments that start with TODO near chunks you would like to revisit.
5.6 Further Readings
- Resources for setting header templates:
- Some content derived from: Cooper, T., Janée, G., Maye, K., Ruhs, N., Erickson, S. 2024. Materials for Code Data Curation Curriculum. Data Curation Network GitHub Repository.
- TADA! Simple guidelines to improve analytical code sharing for transparency and reproducibility is an excellent preprint article on code sharing guidelines: TADA (Transferable, Available, Documented and Annotated). Ivimey-Cook, E. R., Culina, A., Dimri, S., Grainger, M., Kar, F., Lagisz, M., Moran, N. P., Nakagawa, S., Roche, D. G., Sanchez-Tojar, A., Windecker, S. M., & Pick, J. L. (2025). TADA! Simple guidelines to improve code sharing. https://ecoevorxiv.org/repository/view/9806/
- docstring R package to replicate docstrings in R.
Donald Knuth, ‘Computer Programming as an Art,’ Literate Programming, (United States: Center for the Study of Language and Information, 1992): ix.↩︎